
7 Ways to Use Russian Nesting Dolls to Teach
Read Time:4 Minute, 53 Second
This month, we have traveled to Russia with our Cooking Around the World series. As we are a Russian/ American household, I appreciate being able to have a variety of Russian Nesting Dolls in our house.
Here are 7 Ways to Use Russian Nesting Dolls to Teach your kids.
Disclosure: This post contains Amazon Affiliate links.
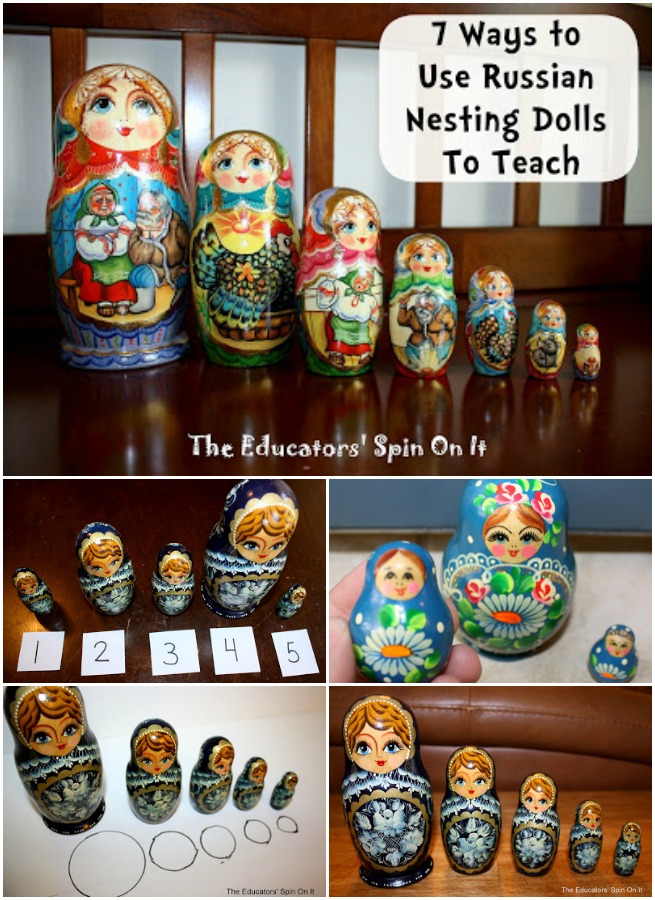
These toys are also referred to as Matryoshkas. They come in all shapes, sizes, and numbers of pieces per set. The most basic sets are 3-5 pieces with simple paintings. Not only are they beautiful as decoration, but they are also a great tool for teaching educational concepts.
The ideas listed below are geared for toddlers to early grade school children. You can take each idea and make it more challenging or provide more support (depending on what your child needs) I have given you some examples on how to do this! Because this toy is adaptable to teaching a variety of concepts, it is a great sibling learning activity.
All of these activities can also be done in the language of your choice – making it a great language learning experience too!


Russian Nesting Dolls to Teach Activities for kids
1. To start at the very basics, Matryoshkas are great for teaching NUMBER CONCEPTS and COUNTING.
Don’t just have your children count each piece, give them the numbers too! You could mix a couple sets together to get into higher numbers for children who have already mastered numbers 1-5!
If you have a bunch of sets, like 3 sets of 5 piece Matryoshkas, you could even use them for basic multiplication. The possibilities are endless!
2. They are also great for letting kids practice their FINE MOTOR SKILLS.
Opening and closing these little sets takes coordination and hand muscles. Some sets are easier than others, but with practice, both my 2 and 5 year old are able to open and close them independently.
3. Then there is the classic, ORDERING or SEQUENCING by size.
Encourage your kids to put them in order from big to small AND small to big. If my 5 year old puts them in order from big to small, I may say, “Can you put them in order from smallest to biggest?” I could also say, “How fast can you assemble the Matryoshkas and put them in order from smallest to biggest.”
This way, she is given a 2 step direction, can practice her fine motor skills and order by size, while getting a challenge by racing the clock!
My 2 year old, on the other hand, needs more support with the ordering concept. I have traced the bottoms of one Matroshka set onto a piece of paper to provide him with a matching activity that will put the Matryoshkas in order.
I show him how to do it, do it with him, then let him do it on his own. When he gets familiar, or comfortable with this task, I will remove the support and see if he can put them in order on his own. *Remember each kid is different!


4. Oh, but you cannot forget the power of VOCABULARY!
I am already starting to use these words with you, but kids do not always have the understanding of vocabulary. It is important to use and explain the size words; small, medium, big, short, tall, smaller, smallest, bigger, biggest, tiny, tinier, tiniest and any other words you may want to use to describe size.
(This vocabulary is in our K and 1st grade state math standards)
5. When they have the concepts of ordering and the vocabulary mastered, you can start to COMPARE! I may show them one Matroshka and have them find another one that is smaller than the one in my hand. (or bigger) Then, have your child pick one and ask you to find one that is smaller or bigger.
6. Storytelling.
Now, this Matroshka may lend perfectly to the retelling of the story of the “Golden Egg,”& In the story, the hen lays a golden egg. The Grandma and Grandpa cannot break it. A mouse comes along and breaks it with his tail and the Grandparents cry. The hen tells them not to cry, she will lay another egg that is not golden!

Don’t you fret if your Matroshka doesn’t have pictures for storytelling. You and your kids could make up your own story using the Matryoshkas as the main characters. Older children can write down these stories.
Maybe even take pictures of the Matryoshkas on an adventure and have them create their tale online. (We use Little Bird Tales)
Another storytelling idea is to read a book, like “The Littlest Matroshka,” and have your children retell the story using your set. They could even use this story as a base and make up their own version of it.
7. Last, but not least, I’d like to throw in a little GEOGRAPHY.
What? With a Matroshka? Why yes, some, but not all Matroshkas will have writing on the bottom of the largest Matroshka. Often this will be the name of the artist who painted it and the city where it was made. Many I see will just have “Made in Russia” written on the bottom.
If you are lucky enough to have some writing on yours, break out the Atlas and find where it was made. No writing? Break it out anyways and show your kids where Russia is. Many Matryoshkas are made in Moscow and Saint Petersburg. Can you find those on the map?


No Matryoshkas in your house? Here are a couple of Amazon Affiliate links. Try a paint your own set!
Here are some additional activities you may enjoy with your child.


Save
Save
Happy
0 %
Sad
0 %
Excited
0 %
Sleepy
0 %
Angry
0 %
Surprise
0 %
Average Rating