
Reignite Children’s Interest in Science with FUN Summer Sensory Bottles for Kids
Read Time:5 Minute, 27 Second

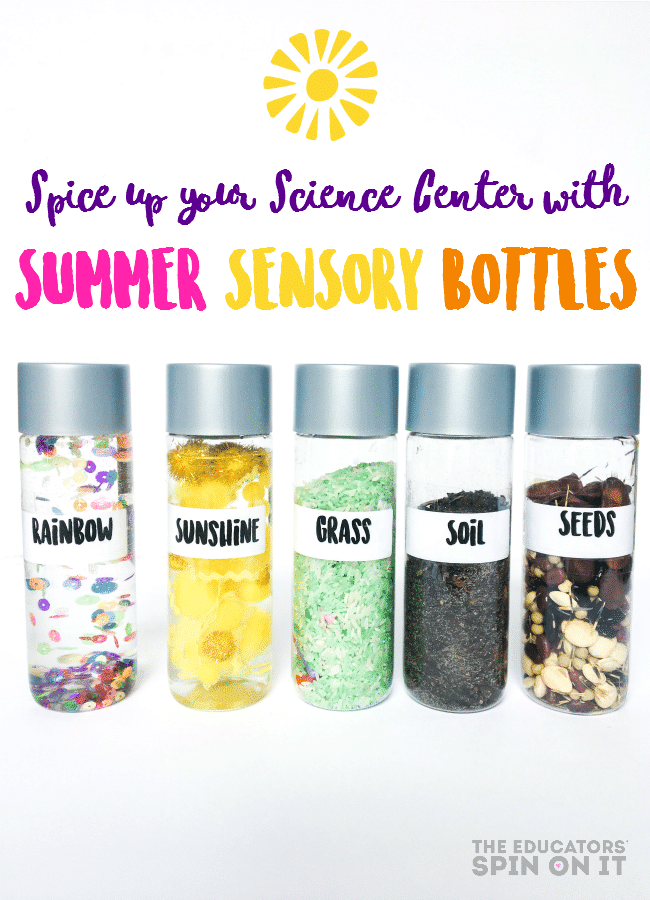
Has your science center sat unchanged for too long? Bring the outside – IN! Make and set these fun summer sensory bottles to reignite children’s interest in science. Read on for how to make and use each bottle.
Summer Sensory Bottles for Kids
Affiliate links
We started off making a list of summer themed words on a large chart paper. The children came up with the following words:
- Rain
- Rainbow
- Sunshine
- Flowers
- Grass
- Soil
- Gardens
- Seeds
Taking some of their words, we gathered materials and made a set of summer sensory bottles for our science center.
Here are our summer sensory bottle ideas:
Rainbow themed Summer Sensory Bottles
Materials needed:
- Empty water bottle
- Rainbow colored sequins
- Glycerin or baby oil
- Hot glue
- Address label or masking tape.
Material note: We researched water bottles and prices. The Voss water bottles work fabulous with little hands because they are easy to see inside, have easily removed stickers, and chunky caps. For the best price, we purchased a case of Voss water bottles from Amazon Prime and had them shipped to our door free.
Learning Objective: Identify the colors in the rainbow
Directions to make the Rainbow Themed Summer Sensory bottle:
First, add several pinches of colored sequins. Then, pour in water until the bottle is half full.

Add in some glycerin or baby oil. This will change the density of the mixture. Put the cap on and shake to mix. If all of the sequins float to the top, add more water. If all the sequins sink, add more glycerin or baby oil. Continue adding until the container is 7/8ths full.
The goal is to get the sequins so they “float” inside the liquid for a moment when the bottle has been shaken.

When the bottle has been filled, hot glue the lid on. Make and tape a label on the bottle. We have used address labels and colored masking tape.
Ask the child: “What colors do you see?”
Seed themed Summer Sensory Bottles
Materials needed:
- Empty water bottle
- A variety of seeds
- Funnel (or kids paint lid from a set like this)
- Hot glue
- Address label or masking tape.
Material Note: Bird seed is the least expensive “seed” option to fill this sensory bottle with. Many bird seeds, however, do contain nuts. We went to our local feed store to purchase seeds in bulk.
Lima bean, green bean, squash seeds, and peas are all great seed varieties that vary in shape, but are still larger in size. Carrot seeds are great to compare – but you would need a LOT of carrot seeds to fill a seed themed summer sensory bottle, as they are very tiny!
Learning Objective: Comparing seeds by size, shape, and colors
Directions to make the seed themed summer sensory bottles.
First, make sure the bottle has no moisture on the inside. Any moisture will cause the seeds to begin molding. Set the funnel over the opening and let the child fill the bottle with seeds.

When it is ¾ full, hot glue the cap securely in place. Hot glue the lid on. Make and tape a label on the bottle. We have used address labels and colored masking tape.
Mix the bottle. Observe and discuss.
Ask the child: “What color seeds do you see? Are all the seeds the same size? Tell me more about their size. Are all the seeds the same shape? Tell me about the shapes you see.”
Sunshine themed Summer Sensory Bottles
Materials needed:
- Empty water bottle
- Yellow Pom-poms
- Yellow rick-rack
- Sharp scissors
- Glycerin or baby oil
- Hot glue
- Address label or masking tape.

Learning objecting: exploring the sun
Material note: Cutting the rick-rack into smaller pieces for the sun rays is tough and an adult only job. Substitute yellow yarn in to make it easier to cut.
Directions to make the sunshine themed summer sensory bottles.
First, fill the empty bottle with pom-poms and rick-rack pieces.

Then fill in a little over halfway with water. Add in glycerin or baby oil until the bottle is 7/8th full. When the bottle has been filled, hot glue the lid on. Make and tape a label on the bottle. We have used address labels and colored masking tape.
Talk about the sun with the child. Say, “The sun is a giant star in the middle of our solar system. It is very hot. Plants need sunlight to make their food.”
Ask the child: “What do you know about the sun?”
Soil Themed Summer Sensory Bottles
Materials needed:
- Empty water bottle
- Soil
- Hot glue
- Address label or masking tape.
Learning Objective: Learn about the natural world
Directions to make the soil themed summer sensory bin
Uncap the empty bottle and fill it with soil from the garden. Secure the cap with hot glue.
Yes – that’s it. This sensory bottle is super easy to make. But very eye opening as the garden soil may have sand, soil, bits of leaves, sticks, clay or other items within it.
Shake and observe.
Ask the child: “What is soil? Why is it important?”
Grass Themed Summer Sensory Bottles
Materials needed:
- Empty water bottle
- green colored rice
- Letter beads
- Spoon
- Funnel (or kids paint lid from a set like this)
- Hot glue
- Address label or masking tape.

Learning Objective: Identify letter names and sounds
Directions to make the grass themed summer sensory bottle.
First, make sure the bottle has no moisture on the inside. Any moisture will cause the rice to begin molding. Set the funnel over the opening and let the child fill the bottle with rice and letter beads.
As the child spoons the letters, say the letter name and the sound it makes.

If you are worried about making a mess, do this step over a large shallow Tupperware container. Even setting a table cloth or sheet under the child’s work area makes clean up a bit easier.

When it is ¾ full, hot glue the cap securely in place. Hot glue the lid on. Make and tape a label on the bottle. We have used address labels and colored masking tape. Then, let the child roll and read the letter names and sounds.
For a challenge, have them think of a word that begins with the letter sound that they just found hiding in the grass.

Love making sensory bottles? Here are some more super fun sensory bottles to explore:
Pumpkin sight word sensory bottle
Science sensory bottles
Crayon themed math sensory bottle game

Happy
0 %
Sad
0 %
Excited
0 %
Sleepy
0 %
Angry
0 %
Surprise
0 %
Average Rating